When I started this blog I barely knew anything about coding. I’ve come a long way since, so much so that I can create and deploy my own blog – all from a Git repository.
So friends, the adventures continue over there!
When I started this blog I barely knew anything about coding. I’ve come a long way since, so much so that I can create and deploy my own blog – all from a Git repository.
So friends, the adventures continue over there!
It’s been a while since the last post! I guess that’s what happens when you go even deeper into your hobby as your job… I now work on frontend and backend projects and services instead of writing documentation for those at EVRYTHNG, and it’s just about as varied, challenging, and rewarding as I expected, which is great. I’ve been working with many new libraries and technologies including:
I’ve also continued to implement a collaborative approach to EVRYTHNG’s open REST API (beyond writing the documentation) with use of OpenAPI 3.0 spec files and tools to generate documentation in the same identical style to what I’d arrived at in the first year and a half curating it by hand. It’s really neat to be able to version and review changes to spec files, then magically generate the same level of quality technical documentation instead of one person writing it all by hand. And of course, contributions to EVRYTHNG’s SDKs and open-source tools.
FitBit Development
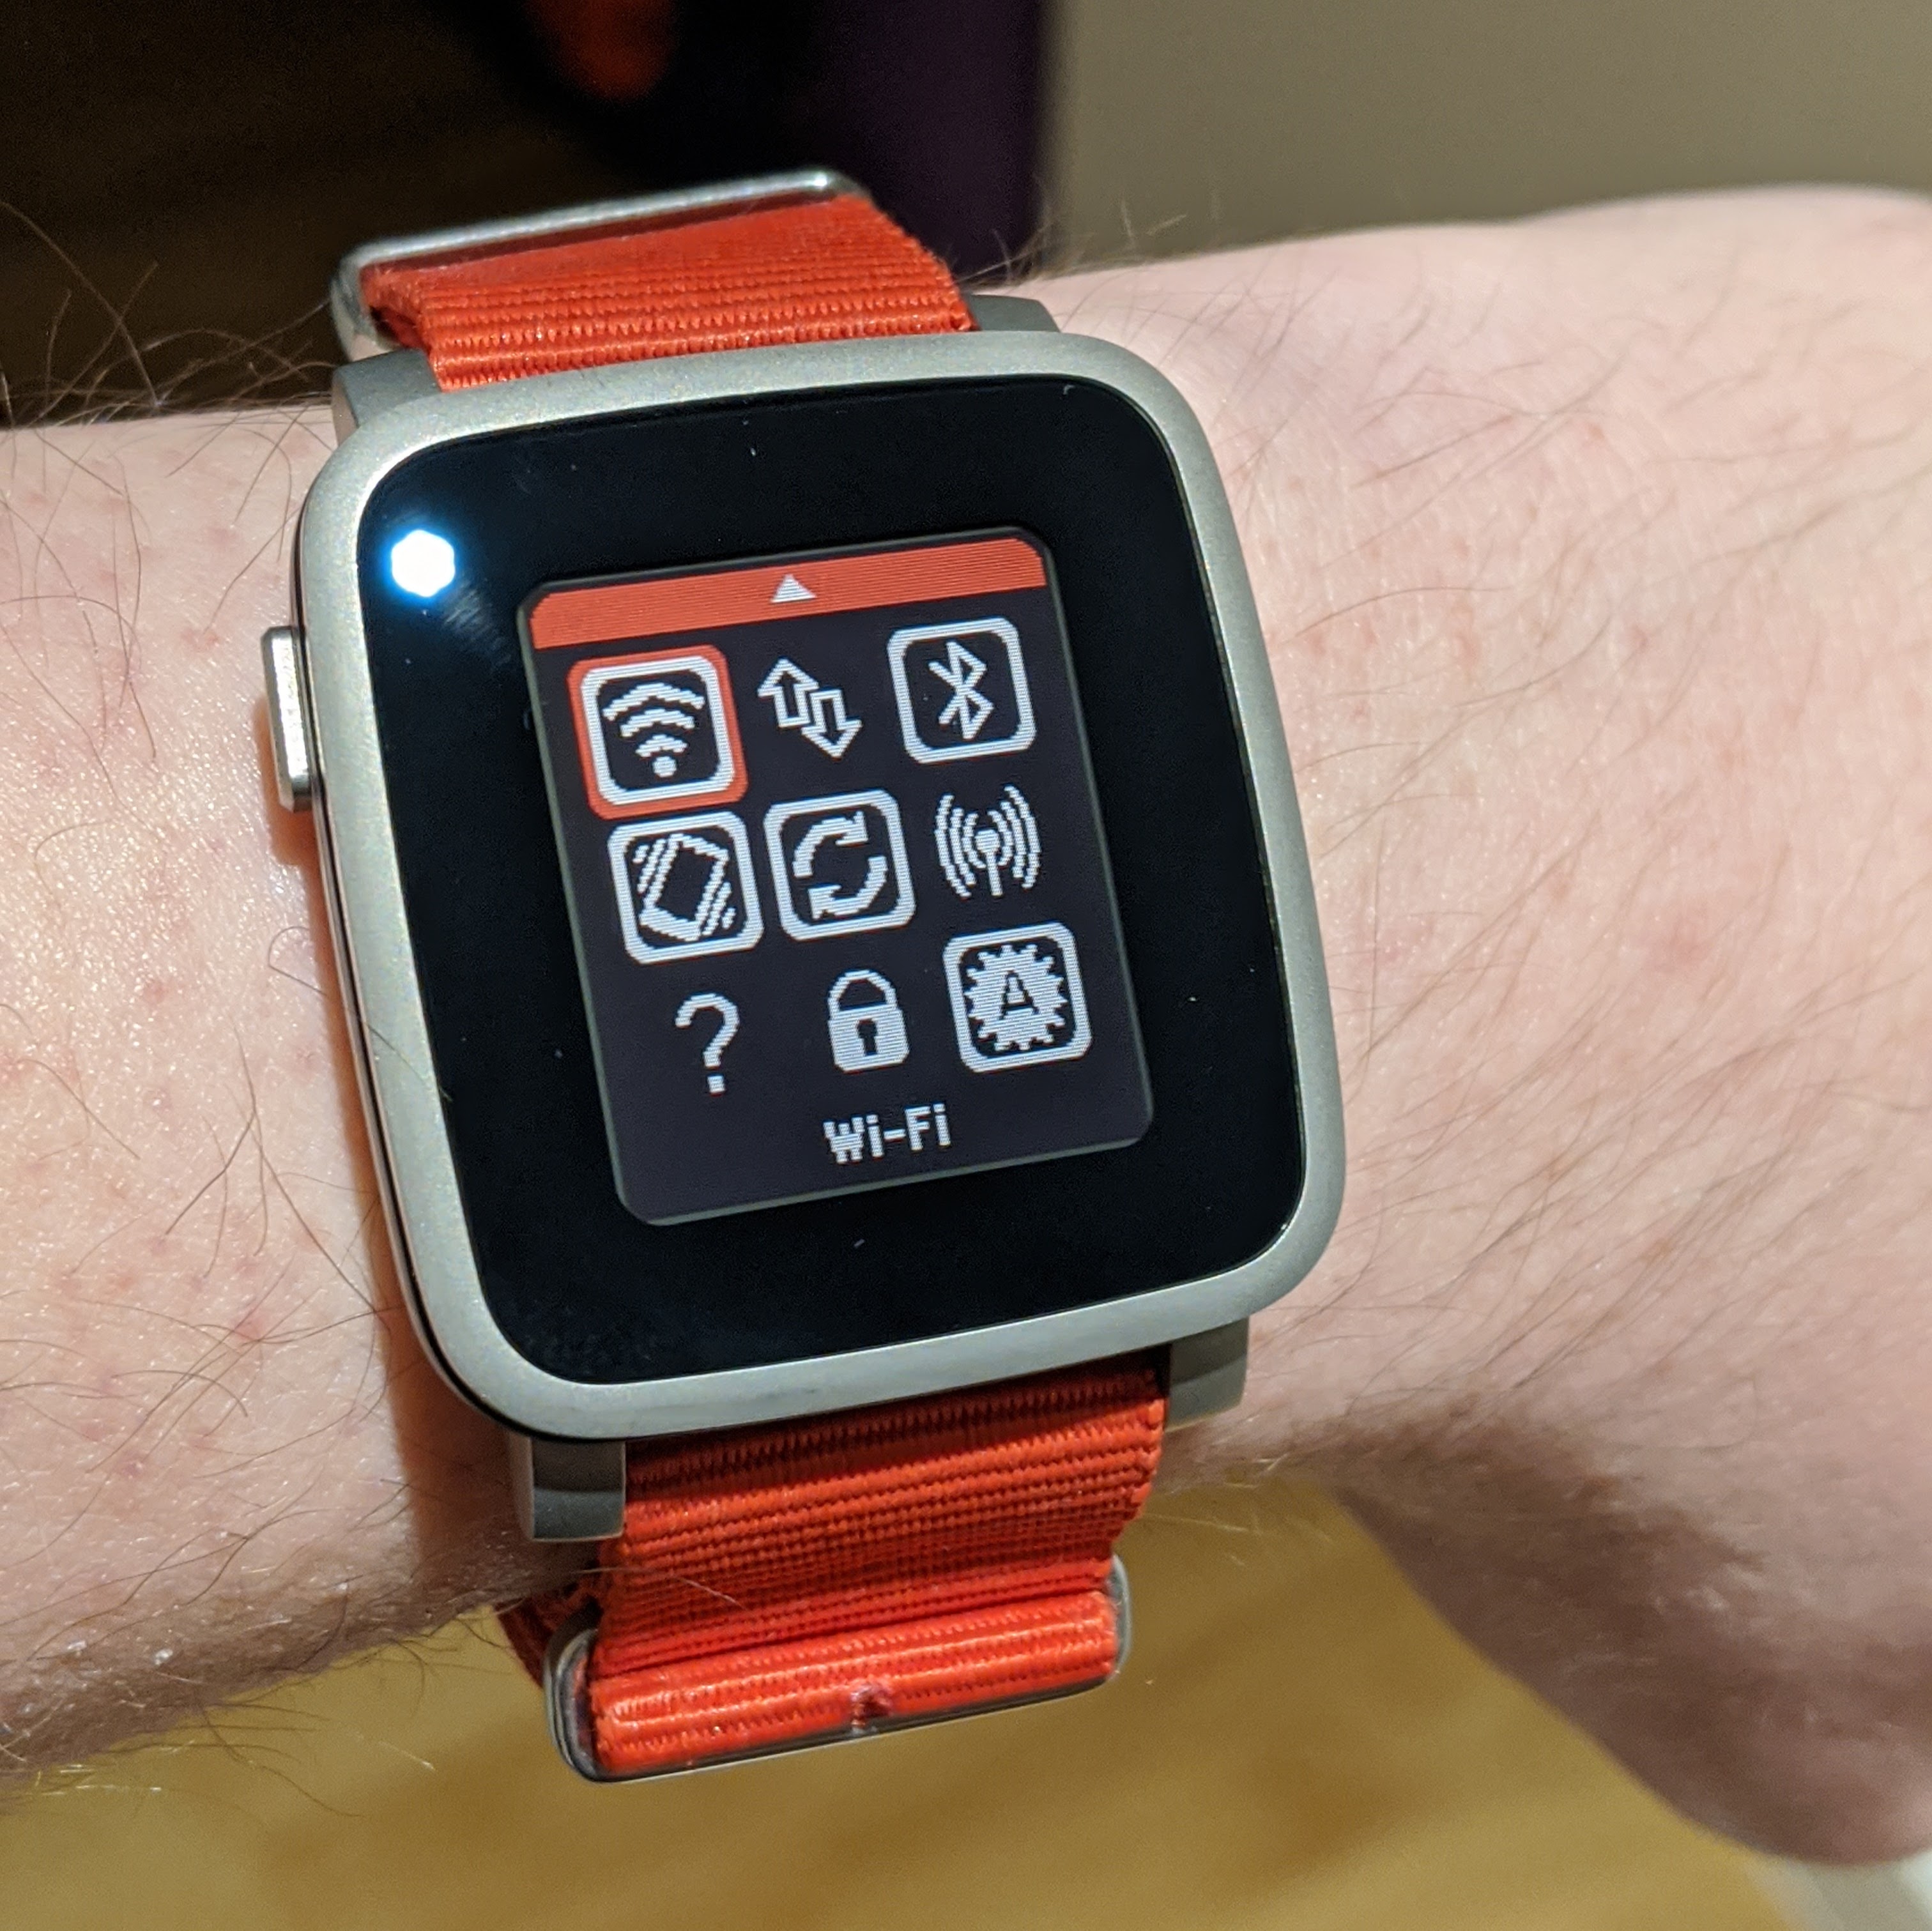
In the meantime, I’ve only been sparsely developing software as a hobby, and mostly for the ever-evolving node-microservices project, and keeping my FitBit apps up to date as new devices and features are added to the FitBit ecosystem. As a result, all apps and faces are available for all devices, and as of yesterday I’ve finally started experimenting with the new Always on Display mode available to SDK based apps. Getting closer and closer to Pebble-like functionality!
In fact, you can search for my name to see all of those on offer:
Pebble Development (!?)
In other developments, changes (once again) to Google’s developer program policies meant I had to dust off the codebase for Dashboard to push an update to remove the donation button. Unfortunately this meant that it had to be upgraded to a much newer SDK version. Which meant that extra measures had to be taken to continue to not be killed in the background. Luckily due to the code being open source I had some help. It’s nice to see that app in action again after so long away from it:
That’s all for now, hopefully more projects and FitBit apps to come. I’d like to try and do something interesting and a bit different using the Versa 2’s gorgeous color OLED display…
After using a number of proper programming languages for various projects over the last several years, one couple stood out as an interesting concepts – the DCPU-16 language from 0x10c, used to program an in-game computer. This was sadly never fully realised beyond community emulators after the project was abandoned, but the idea was to provide a simple language that players could learn to use to advantage themselves. For example, to tell a weapon how to track another ship, given its bearing and speed.
I’d like to see a game fully utilise such a concept one day, but until then, I’d thought I’d have a go at creating a very simple pseudo-language and see what would be involved.
The Result
Turns out the easiest way to go about it to is to use an existing language as a platform – a transpiler. For example, languages like TypeScript and Dart that are transformed to JavaScript, a much more portable language (browsers, Node, watches, etc.) that can easily be run in many places.
To this end I set out (in my typically enjoyed ‘do it yourself’ style) to try and make a simplified language that is converted into JavaScript, line for line. The result is a project unimaginatively dubbed ‘islang‘ (the ‘is’ language), so called after the simplest possible statement. The aim is to create a ‘language’ that is easily learned and uses as little symbols or special syntax rules as possible, which I have seen pose a barrier to new programmers who have never seriously used a programming language before, and would say something like ‘why does that line only have a curly bracket in?’
Is
So without further ado, here is a sample program that implements a typical ‘greeter’ scenario:
task greet gets name
  log 'Hello there, {name}!'
end

task main
  value name is 'Chris'
  run greet with name
end

run main
Hopefully you’ll notice that there aren’t many special characters. Even the indentation isn’t really necessary, but as always aids readability. The structure is based on classic variables, sub-routines (here called ‘tasks’), and the concepts of assignment and calling those tasks.
Let’s break it down:
The output is thus:
Hello there, Chris!
Compilation
Take a look at the project on GitHub, specifically ‘transform.js‘, which uses a sequence of conventional rules to mould the input line (and its ‘tokens’, the individual words in the line) into the output line of JavaScript. This function is includes by ‘index.js’ and processes every line in the source ‘.is’ file into one output JavaScript files called ‘build.js’. The programmer can then run their program using node as usual.
npm run compile ./my_program.is
node build.js
In this manner, more rules can be added, though it is limited right now to one rule per line, and only a few cases where combinations occur (such as returning a function call). This could be made more sophisticated in the future, but I confess as an Electronic Engineering graduate I have never studied how real compilers work!
A More Complex Example
Here’s a slightly more complex example that calculates the result of a series of Fibonacci calculations:
task fibonacci gets input
  when input <= 1
    return input
  end

  // return fib(n-1) + fib(n-2);
  value n_minus_1 is input - 1
  value n_minus_2 is input - 2
  value result_1 is run fibonacci with n_minus_1
  value result_2 is run fibonacci with n_minus_2
  return result_1 + result_2
end

task main
  value fib_output is run fibonacci with 9
  log 'fib_output: {fib_output}'
end

run main
The pattern is similar, with tasks set up and called from a ‘main’ task. Another task performs the ‘f(n-1) + f(n-2)’ calculation and results the result, using some other features of the language.
Here’s the resulting JavaScript:
// compiled from islang source

function fibonacci (input) {
  if (input <= 1) {
    return input;
  }

  // return fib(n-1) + fib(n-2);
  let n_minus_1 = input - 1;
  let n_minus_2 = input - 2;
  let result_1 = fibonacci(n_minus_1);
  let result_2 = fibonacci(n_minus_2);
  return result_1 + result_2;
}

function main () {
  let fib_output = fibonacci(9);
  console.log(`fib_output: ${fib_output}`);
}

main();
fib_output: 34
Looks familiar, right?
Language Features
Right now those are:
value my_value is 10

my_value is 20

my_value is run increment my_value
task increment gets input_value
  return input_value + 1
end
when temperature  15
  log 'Might be cold out there'
  temperature is temperature + 1
end
object car
car property color is 'red'
car property num_wheels is 4

log 'This {car.color} car has only {car.num_wheels} wheels!'
Wrapping Up
This turned out to be longer than I thought it would be, but the general point is – this is a lot of run, and I hope to add more features in the future, maybe to even use it to teach or provide some more depth or extensibility to another project…
If you’re interested, check out some of the example programs, and give the compilation a try!
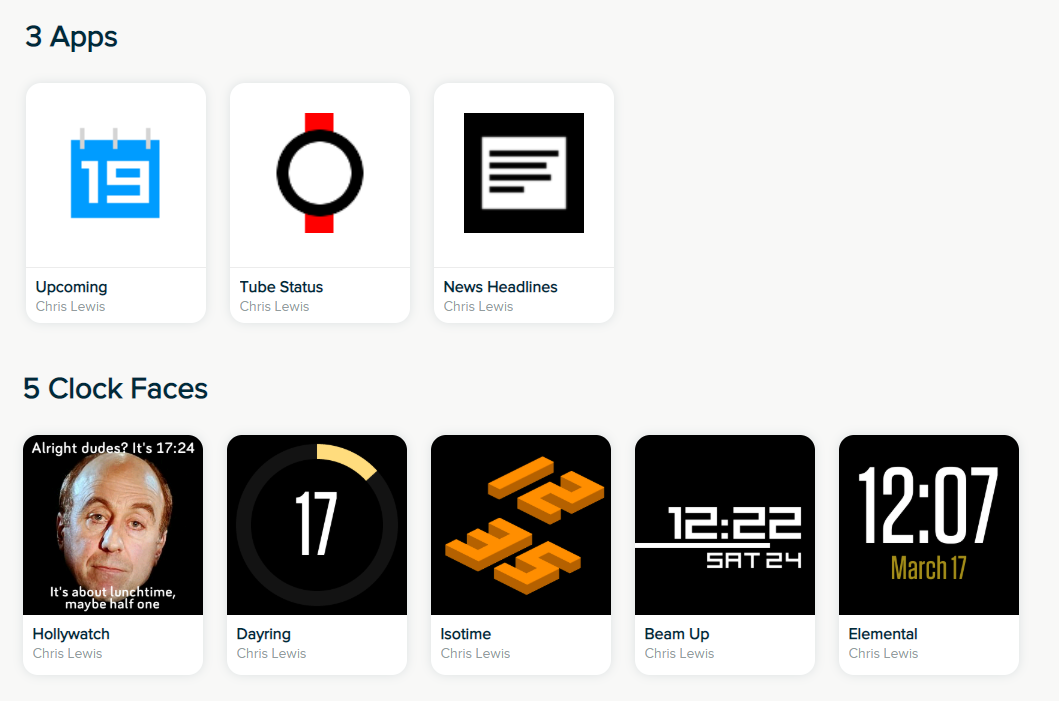
It’s been some time since the last post and now some new apps are available! The lineup now includes:
Since both these new apps use the same layout and code style, I’m considering perhaps trying to make it into a UI framework that can be easily reused with other data sets… Perhaps one for the future.
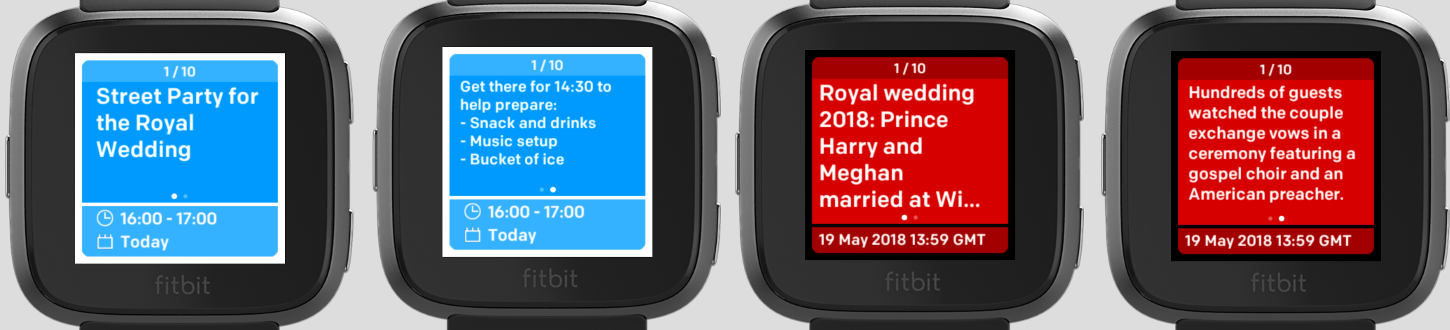
These apps were the two I was most looking forward to having completed on FitBit, since one replaces the extremely important ability to quickly see what meetings I have coming up that I got from Pebble timeline, and the other enables me to stay vaguely up to date with the world (this weekend’s wedding excepting!) in small glimpses.
So what’s next? As mentioned in the last post, I’d like to try and get back to basics with some new watchface concepts, and also explore the possibility of beginning to bring some Dashboard functionality to FitBIt, depending on which data is available. I’m thinking web APIs for networks and battery level to get started, but sadly no actuation for the time being.
As always, you can see the code for yourself on GitHub.
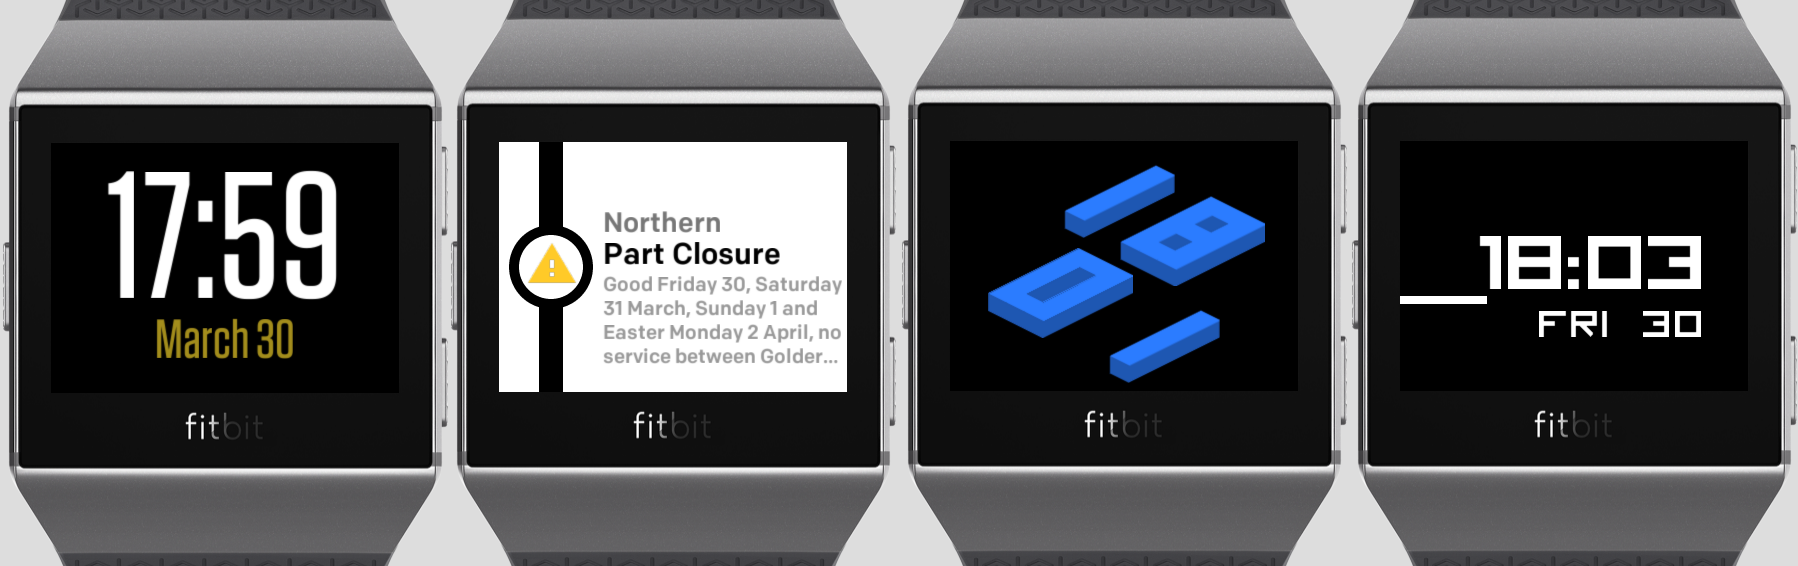
After some months and a couple of releases for the FitBit Ionic a few months ago, here are the first batch of watchfaces and app for both Ionic and the new Versa! Reviewed and released right now are:
The development experience has gotten much better, with very good connectivity of the developer connection with the updates paving the way for Versa, and also due to the FitBit OS Simulator, which closes the iterative gap from minutes to seconds!
So what’s next?
News Headlines port needs to be completed, though getting the same UI as the Pebble app is proving to be a layout challenge. So I may opt to scrap it and build a new one, similar for Tube Status.
I also want to create some more original watchfaces for FitBit OS to take advantage of the gorgeous full-color screens these watches have. So look out for more!
I’d also love to port Dashboard (as I still use it regularly, and many have found it an invaluable remote and automation agent), but that will have to wait until an equivalent of PebbleKit Android is released by FitBit, or some other Intent-based mechanism for receiving app messages in a third party Android app.
In the meantime, you can find the source for all my FitBit OS apps and watchfaces in my fitbit-dev GitHub repo.
A quick post about moving my Node app tests to Mocha and Chai. These are frameworks used where I work, and I figured I may as well learn something new and have more confidence in my Node apps when I deploy them, so how hard can it be?
Turns out, quite easy. These testing frameworks are deigned to be flexible and resemble plain-english test descriptions. In fact, the new testing code looks a lot like my home-grown test framework. Have a look below for a comparison (taken from the led-server project):
(You can see the implementation of testBed module in the node-common project)
Home-grown
async function testSetAll(expected) {
  const response = await testBed.sendConduitPacket({
    to: 'LedServer',
    topic: 'setAll',
    message: { all: [ 25, 25, 52 ] }
  });

  testBed.assert(response.status === 200 && response.message.content === 'OK',
    'setAll: response contains status:200 and content:OK');
}

async function testSetPixel(expected) {
  const response = await testBed.sendConduitPacket({
    to: 'LedServer',
    topic: 'setPixel',
    message: {
      '0': [ 25, 25, 52 ],
      '1': [ 100, 100, 100 ]
    }
  });

  testBed.assert(response.status === 200 && response.message.content === 'OK',
    'setPixel: response contains status:200 and content:OK');
}
Mocha/Chai
describe('Conduit topic: setPixel', () => {
  it('should return 200 / OK', async () => {
    const response = await testBed.sendConduitPacket({
      to: 'LedServer',
      topic: 'setPixel',
      message: {
        '0': [ 10, 20, 30],
        '1': [30, 50, 60]
      }
    });

    expect(response.status).to.equal(200);
    expect(response.message.content).to.equal('OK');
  });
});

describe('Conduit topic: setAll', () => {
  it('should return 200 / OK', async () => {
    const response = await testBed.sendConduitPacket({
      to: 'LedServer',
      topic: 'setAll',
      message: { all: [64,64,64] }
    });

    expect(response.status).to.equal(200);
    expect(response.message.content).to.equal('OK');
  });
});
As a result, my script to run all the test suites of each Node app (after booting them all together locally) looks like a lot of this – all green, and no red!
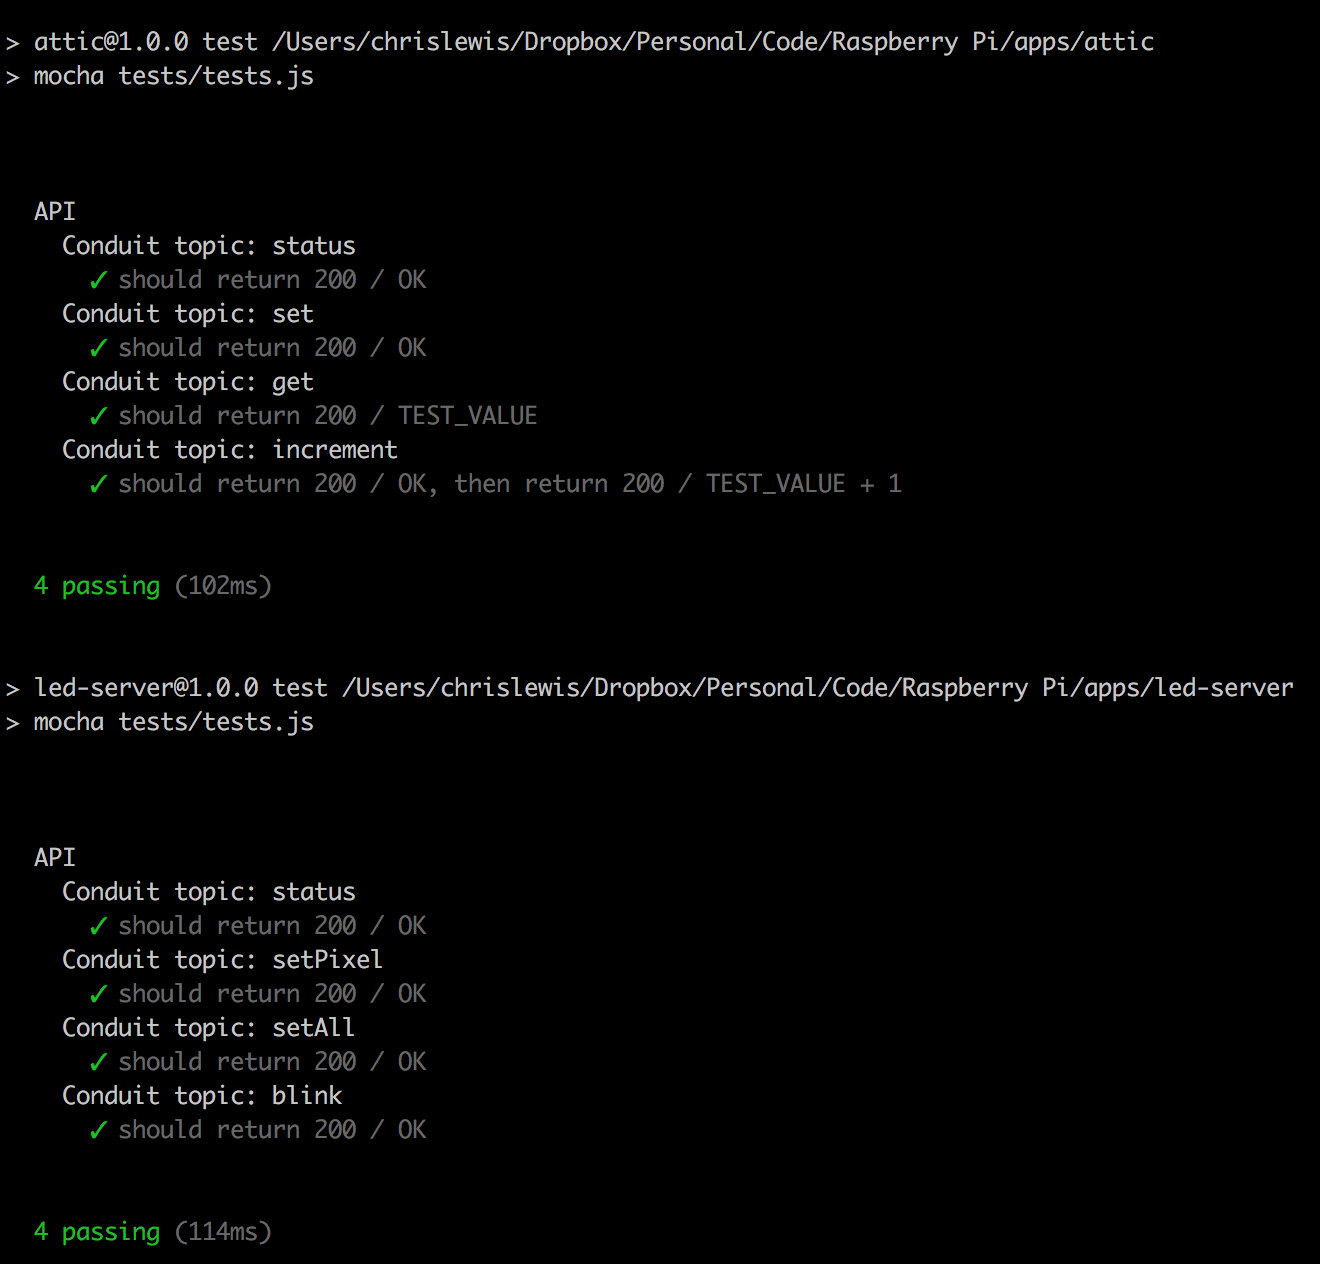
Hopefully this new skill will enable me to write better code both personally and professionally in the future – I may even try out TDD for my next project!
A problem I had found when setting up my Node.js services on a new Raspberry Pi (or resetting one that had gotten into a bad state) was keeping track of the individual port numbers of each one. This might typically look like this:
…and so on. This wasn’t only a problem with setup, but also with maintaining all the numerous config.json files for each app that needed to talk to any of the other ones.
So to do something about it, I decided to have a go implementing a central message broker service (nominally called Message Bus, or MBus) from scratch (one of the key features of my hobbyist development, as you tend to learn a lot more this way). This new service had to be generic to allow all kinds of messages to flow between the services that they define themselves. It had to be fault tolerant and so should use JSON Schema to make sure the messages are all of the correct format. And lastly, it shouldn’t care what the connection details are for each app at startup.
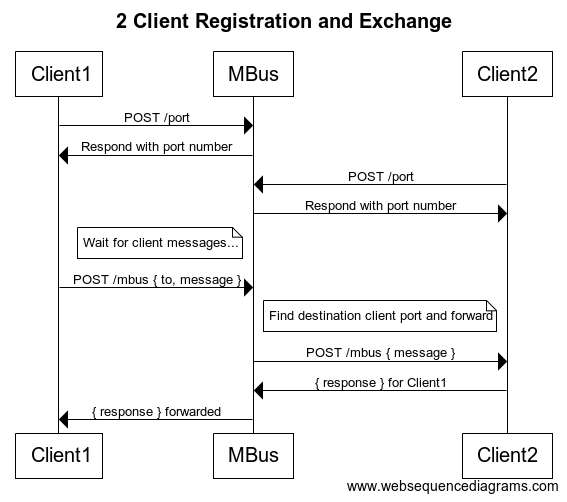
Client Registration and Message Exchange
To solve this last problem, each app uses a common Node.js modules that knows the port of a local instance of MBus and requests a port assignment. MBus responds with a randomly rolled port number from a range (making sure it isn’t already allocated to another app), and the client app then creates an Express server that listens on the allocated port. If MBus receives a message with a known client app as the destination, it simply sends it on to that port within the local machine, where the client app will be listening as expected. These two processes are summarised below:
Client Implementation
To implement a new client to talk to MBus, it includes the mbus.js common module, and registers itself at runtime. It also specifies the message schema it will expect from MBus using conventional JSON Schemas:
const mbus = require('../node-common').mbus();

const GET_MESSAGE_SCHEMA = {
  type: 'object',
  required: [ 'app', 'key' ],
  properties: {
    app: { type: 'string' },
    key: { type: 'string' }
  }
};

const SET_MESSAGE_SCHEMA = {
  type: 'object',
  required: [ 'app', 'key', 'value' ],
  properties: {
    app: { type: 'string' },
    key: { type: 'string' },
    value: {}
  }
};

async function setup() {
  await mbus.register();

  mbus.addTopic('get', require('../api/get'), GET_MESSAGE_SCHEMA);
  mbus.addTopic('set', require('../api/set'), SET_MESSAGE_SCHEMA);
}
Once this is done, the config.json is also updated to specify where it can find the central MBus instance and the name it is to be identified as when messages are destined for it:
{
  "MBUS": {
    "HOST": "localhost",
    "PORT": 5959,
    "APP": "LedServer"
  }
}
The mbus.js module also takes care of the message metadata and the server checks the overall packet schema:
const MESSAGE_SCHEMA = {
  type: 'object',
  required: [ 'to', 'from', 'topic', 'message' ],
  properties: {
    status: { type: 'integer' },
    error: { type: 'string' },
    to: { type: 'string' },
    from: { type: 'string' },
    topic: { type: 'string' },
    message: { type: 'object' },
    broadcast: { type: 'boolean' }
  }
};
Example Implementations
You can find the code for MBus in the GitHub repository, and also check some example clients including Attic, LED Server, and Monitor.
Barring a few client app updates (luckily no very serious user-facing apps depend on these services for core functionality right now), all the main services now use MBus to talk to each other. The image below shows these setups for the main machines they are deployed on:
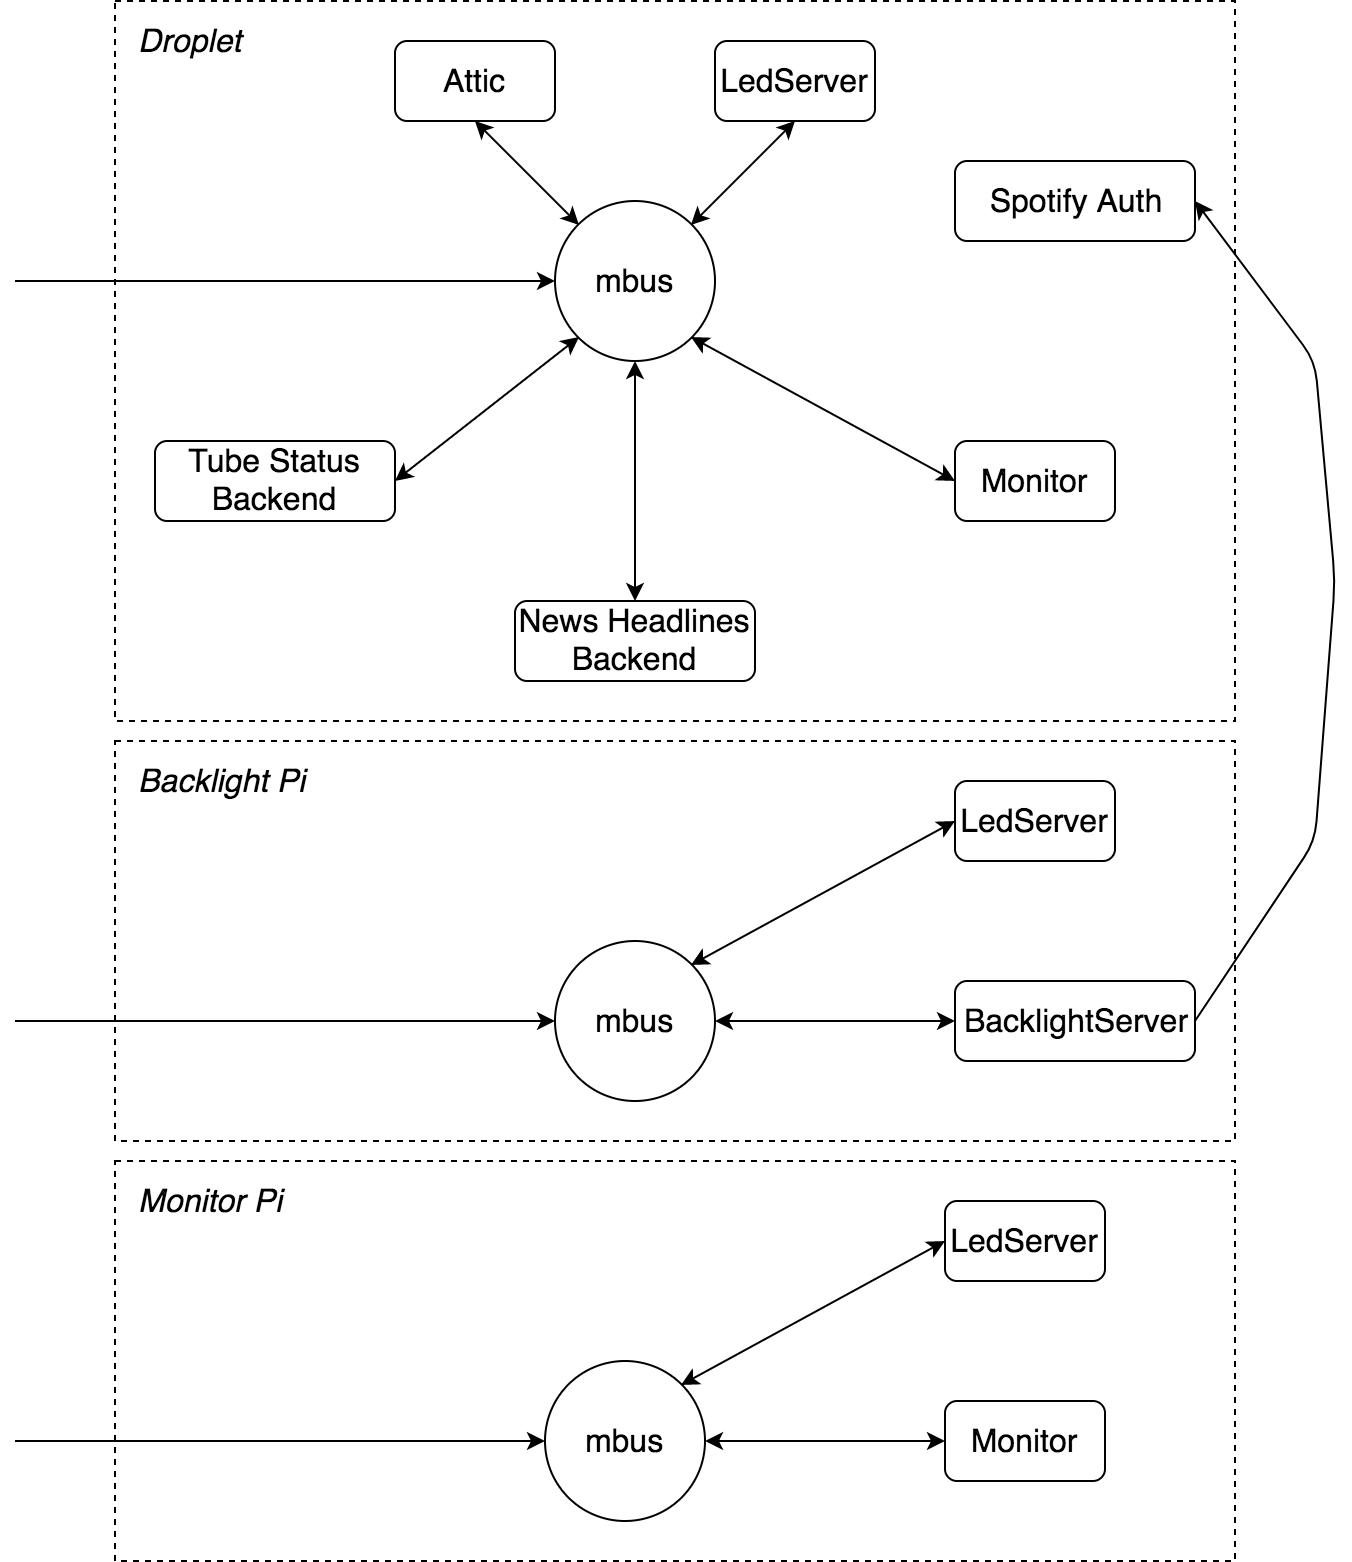
Finally, over the next few months I’ll be updating what clients there are to talk to their remote counterparts in this manner, and also take advantage of the fact it is now each to add and address future services in the same manner without needing to configure ports and addresses for every individual service.
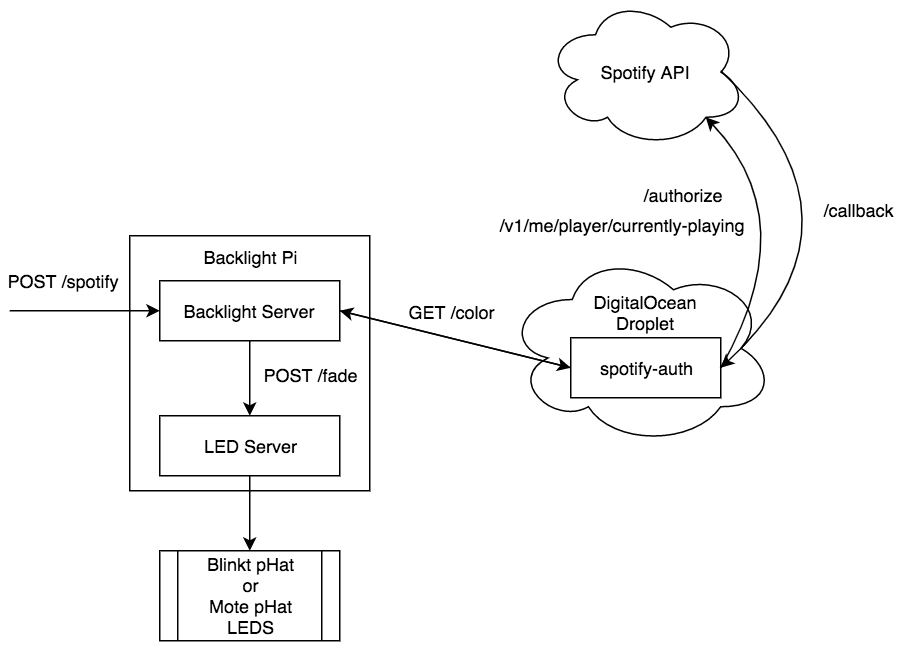
Adding Raspberry Pi based backlighting to my desktop PC with backlight-server, and moving to a new flat gave me an interesting idea – add an API to the backlight server to set the lights to the dominant colour of whatever album is playing in my Spotify account. How hard could it be?
The first step was to read up on the Spotify API. I quickly found the ‘Get the User’s Currently Playing Track’ API, which fit the bill. Since it deals with user data, I had to authenticate with their Authorization Code Flow, which requires multiple steps as well as a static address for a callback containing the authorization code granted to my application. I experimented with giving the Spotify Developer site the IP address of my Server Pi, but that could change, which would mean editing the application listing each time that happened, which was unacceptable for a seamless ‘setup and forget’ experience I was aiming for.
The solution was to resurrect my DigitalOcean account to host a small Node.js app with a simple task – receive the callback from Spotify with the authorization code with which access and refresh codes would be granted, and fetch and determine the dominant colour of the album art currently playing. This service would in turn be used by backlight-server to light up my living room with the appropriate colour.
This authorization flow took a long time to get right, both from a code perspective (I used the spotify-web-api-node npm package to make things programmatically easier), as well as a behavioural perspective (when should the token be refreshed? How to propagate errors through different services? How can the app know it is authorized at any given time?), but once it worked, it was very cool to see the room change colour as my playlist shuffled by.
I had a half-hearted attempt at figuring out the dominant colour myself using buckets and histograms, but in the end decided to preserve my sanity and use the node-vibrant package instead, which worked like magic!
So this is basically how the whole thing works, and you can see the code for the spotify-auth microservice on GitHub. The diagram below may also help explain:
 So what next? Well, those smart RGB light bulbs are looking a lot more interesting now…
With not a lot going on in terms of my Pebble apps (still very much in a ‘if it ain’t broke’ situation), my hobbyist attentions in recent months turned to my Raspberry Pi. With not a lot of exciting ideas for hardware hacking, it occurred to me that software applications of the device might be a bit more interesting.
Beginning with moving the backend services for News Headlines and Tube Status out of a $5 Digital Ocean Droplet to a $0 Raspberry Pi under my desk (with a few forwarded ports, of course), I’ve steadily refined the standard pattern used to write and maintain these apps. At the most there have been six, but today there are five:
update interface function, making it extremely extensible.With my adventures in Node and discovering convenient or standardised ways of doing things like modules, data storage/sharing, soft configuration, etc. these apps have all been refined to use common file layouts, common modules, and a standard template. With its relatively stable state of maturity, I’d like to share this with readers now!
What? It’s not February 2017 anymore? The pattern has matured even further, but I’ve only now found the time to write this blog post? Well, OK then, we can make some edits…
Disclaimer: This isn’t an implementation of any actual accepted standard process/pattern I know of, just the optimum solution I have reached and am happy with under my own steam. Enjoy!
File Layout
As you can see from any of the linked repositories above, the basic layout for one of my Node apps goes as follows:
src/
  modules/
    app-specific-module.js
  common/
    config.js
    log.js
  main.js
package.json
config.json
.gitignore   // 'config.json'
The src folder contains modules (modules that are specific to the app), and common (using common modules shared between all apps, such as log.js (standard logger, pid logging, and uncaughtException & unhandledRejection handlers), as well as main.js, which initialises the app.
This pattern allows all apps to use common modules that can be guaranteed not only the presence of each other, but of a common config.json that they can all use to draw configuration information (such as log level, API keys, latitude and longitude, etc.).
Soft Configuration
Of particular interest is the config.js module, which all modules that use config.json information include instead of config.json. It is untracked in git, and so can safely contain sensitive keys and other values. It also guarantees that keys required by modules are present It also provides some additional benefits:
config.json file is presentconfig.json file, that they themselves require. Here is an example.For example, a fictitious module may require an API key to be present in the ENV member of config.json:
const config = require('../common/config');

config.requireKeys('fictitious.js', {
  ENV: {
    API_KEY: ''
  }
});
The way config.js behaves, if this structure is not present in config.json, the app will not start, and will tell the operator (i.e: me!) that the value should be provided. Handy!
Standard Modules
Any of these Node apps (and any new apps that come along in the future) can make use of a library of drop-in standard modules, many of which can be found in action in any of the linked repositories at the top of this post), including:
event-bus.js – Provide a pub/sub ‘event bus’ style of communication between modulesfcm.js – Send an event to Firebase Cloud Messaging to show me a notificationled-server-client.js – Communicate with the localhost Blinkt! LED Server instancescraper.js – Scrape some text using a series of ‘before’ markers, and one after ‘marker’config.js – Access ‘smart’ configuration with additional capabilitiesgist-sync.js – Synchronise a local JSON file/set with a remote Gistleds.js – Directly drive the connected Blinkt! hatdb.js – Emulate a simple get/set/exists interface with a local JSON fileip.js – Look up the address of the ‘mothership’ server (either Server Pi or a Digital Ocean Droplet)log.js – Standard logger, asserts, uncaught/unhandled catching.Wrapping Up
So with this standard pattern to my Node apps, it makes it a lot easier to manage the common modules as they are updated/improved, manage SCM untracked soft configuration values (as well as make sure I provide them after migration!), and allow modules to be as drop-in as possible. As with most/all of my hobbyist programming, these approaches and modules are the result of personal refinement, and not from any accepted standard, which is my preferred style when I am the only consumer. Maximise the learnings!
Expect more sporadic information as these apps develop, and enjoy the pins!
For some just beginning their programming journeys a common example to conquer is blinking an LED, which usually goes something like this:
digitalWrite(13, HIGH);
delay(1000);
digitalWrite(13, LOW);
For me, I decided to try a much harder approach, in a fiddly effort that could be regarded as virtually pointless. Nevertheless, I persisted, because I thought it would be cool.
The idea: blink a Blinkt LED on Server Pi whenever it serviced a request from the outside.
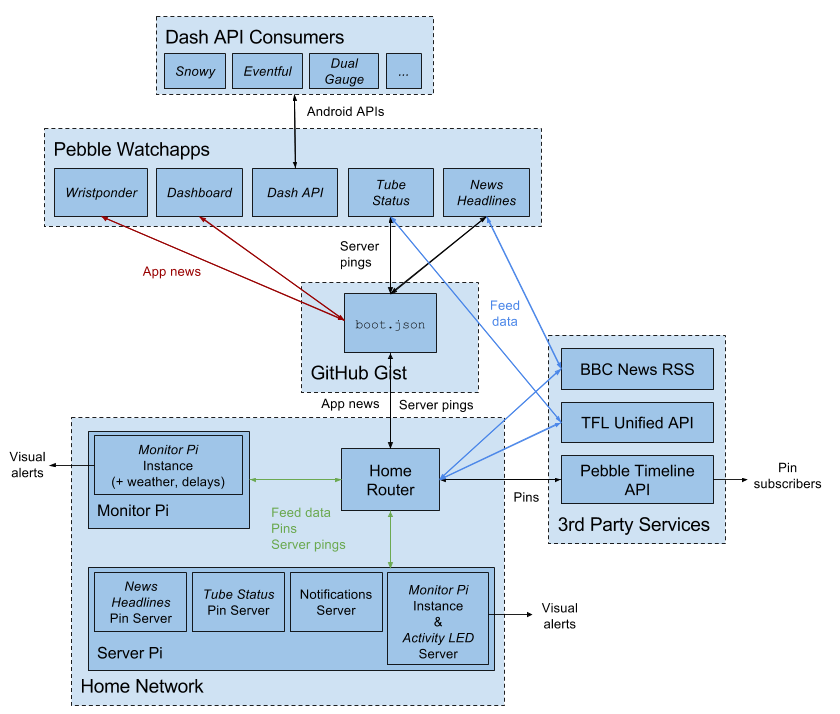
For those unfamiliar with my little family of Raspberry Pi minions, here is a brief overview:
Maintaining this small fleet is a joy and a curse (one or both of “my own mini infrastructure, yay!” or “It’s all fallen over because Node exceptions are weird, noo!”), but since I started versioning it all in Git and adding crontab and boot scripts, it’s become a lot easier. However, for this particular task, I found only one process can usefully control the Blinkt LEDs on top of Server Pi. Since this is a parameterised (services only) instance of Monitor Pi, it must be this process that does the blinking when a request is processed.
Since I’m already a big fan of modular Node.js apps, I just added another module that sets up a single-endpoint Express server, and have each of the other three Server Pi processes POST to it whenever they service a request with their own Express servers. Neat!
An hour of synchronising and testing four processes locally and on-device later, and I now have a blue blinking LED whenever a request is serviced. Sadly the activity isn’t as high as it was in the News Headlines heyday when it was tasked with converting news story images to Pebble-friendly 64 colour thumbnails and an experimental analytics service late last year, but with the interesting tentative steps the unreleased notification service is taking, Server Pi may end up seeing a bit more action than simple status checks and app news lookups in the future.
With all this work done, it’s also time for another diagrammatic mess that I like to call my infrastructure…